Put the pump handle into the pump lever. Then pull the trigger to spray the pesticide on the desired area ensuring uniform coverage.

Wand And Trigger Maintenance For All Solo Sprayers Youtube
Make adjustments prior to filling tank.
. Solo Diaphragm Pump Repair Kit. The bottom of the pressure relief valve is submerged and will discharge water under pressure. Release any pressure drain and rinse the sprayer after each use.
Pump the clear water through the hose sprayer gun and nozzle to remove any soapy residue. 2 Apr 11 2010. Sprayer Disassembly Repair.
Solo backpack sprayers and handheld tank sprayers are built tough and made to last. If you have those quick clip fan nozzle couplers by Teejet then get another couplerscreen and viton o-ring. All the necessary hardware should have been provided with your backpack sprayer.
The Solo backpack sprayer seemed a good idea but important parts are not up to the job. Yes it is possible with the use of a spray drift guard and good care. This reg- ulator is operator adjustable.
Filling the sprayer this full makes it very easy to pump up to the maximum pressure. Lack of lubrication 425 Lubricate Viton collar. This is ideal for inter-row work or for killing weeds along fence lines.
These manual sprayers have two- to five-gallon tanks. These make it easy to take the sprayer apart for storage. The shoulder straps arent usually padded and the harness doesnt include hip or chest straps.
Dirty cylinder walls 425 Remove piston cleanreplace piston collar. How to clean filter in Solo backpack sprayer. The hose clamp is a cheap plastic affair with an aggressively threaded screw that easily strips the plastic the sprayer hose is too short by about 300-450mm and the cheap spray wand is very delicate.
That is why our backpack sprayers are the first choice of farmers professional landscapers and do-it-yourselfers everywhere. Finally its spraying time. Collar swollen from long term exposure 425 Replace collar and maintain according to instructions.
However prolonged exposure because chemicals are left in the sprayer greatly decreases. Pour the soapy water out of the pump sprayer and fill the reservoir with warm clear water. Remove pump lever clean grease bushings.
Step 5 - Cleaning The Wand. You do not need to be concerned with your sprayer calibration since you are only cleaning out the hose and wand. If the sprayer will not hold pressure fill the sprayer 3 below the top with water.
Backpack sprayers start at 30 to 50. Insufficient resistance during repeated pumping and no pressure. Attach the stop plate now if your model was supplied with one.
In order to clean out your wand you will need to refill your tank with hot water. Only show this user. In fact SOLO has earned global recognition for superior quality spraying equipment since 1948.
These kits contain easy to follow instructions. Look inside the spray tank. 199 72 Solo 00-10-141 Fill Head Screw.
The stop plate should be placed on the inner bolt hole. Let the clean water run through the hose and wand. I have seen the videos on gemplers about replacing the seals looking to see if amyone has 1st hand experience with the inner workings of a solo back pack sprayer.
Replace the cap and pump 4 times. And every 5 seconds or so pump the handle to ensure constant pressure inside the sprayer. Allow the pump sprayer to air dry.
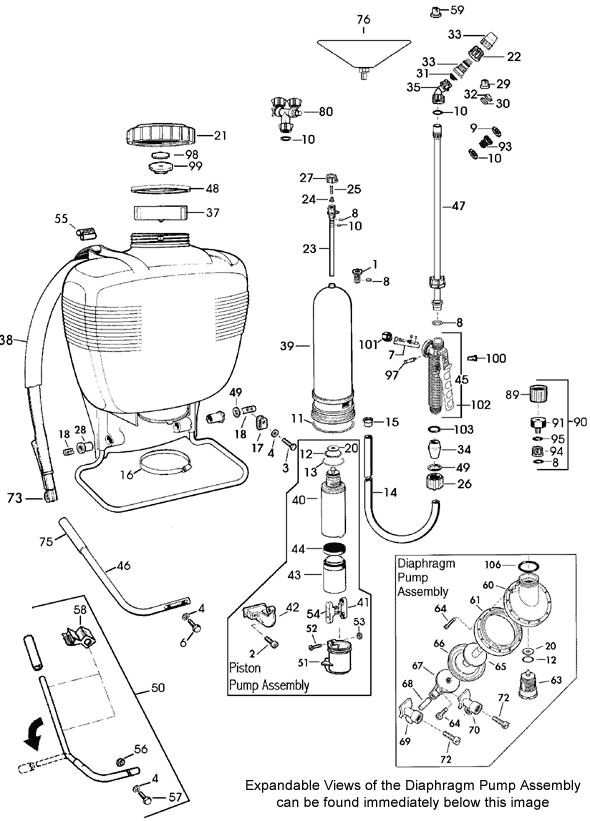
Pour warm water into the reservoir of the pump sprayer along with a few squirts of dish soap. Parts For Solo Backpack Sprayer Model Numbers 425 475 435 485 474 476 Click on the part number you need in diagram for pricing and details or scroll down We carry a full line of Solo Sprayer Parts and Solo Backpack Sprayers 52 Solo 00-10-110 Fill Head Screw. Seals will dry out due to age and regular exposure to pesticides.
Not sure where exactly are you leaking but all of the wand and nozzle assemblies I use teflon tape. There is also a smaller round and translucent pro-spot guard which is excellent for spotting round weeds such as thistles or dandelions. Sometimes the blocked filter causes the sprayer to stop working.
To adjust the regulator remove the tank cap and the filter basket. Solo Shut Off Valve Repair Kit. The Solo backpack sprayer is equipped with a built-in regulator to control output pressure.
Post by 95mmrenegade Mon Jun 15 2020 1011 pm. 3 Top off the tank add 1 gallon of 3 household ammonia for every 100 gallons of water circulate through the sprayer for 5 minutes and then flush all hoses booms screens and nozzles for a minimum of 15 minutes. In this GEMPLERS video well go over how to disassemble and repair a Solo piston pump backpack sprayer using the Solo piston pump repair kitGet the Solo P.
Storing the sprayer under pressure causes the pressure cylinder to fill with solution resulting in poor sprayer performance. Joined Jan 24 2009. First off pump the handle for 10-15 times and test the sprayer.
2 Fill the spray tank with clean water and flush all hoses booms screens and nozzles. If you want to turn your backpack sprayer on for this step that would. Trying to see the feasibility turning it into an electric sprayer by removing most of the pump assembly.
Solo backpack sprayer. SOLO offers an oval drift guard with a flat spray nozzle fitted. Spray the pesticide on your crops.
Could be good but being cheap in important areas lets it. Align the bolts washers or pins with the pre-drilled holes push pin in or screw together and tighten.

Troubleshooting Performance Issues With Your Solo Backpack Sprayer

Solo Back Pack Sprayer Rebuild Kit Install M425 101 Youtube

Solo 475 4 Gal Backpack Sprayer Do It Best World S Largest Hardware Store

Solo Backpack Sprayer Rebuild Success Youtube

How To Disassemble Repair And Maintain A Solo Piston Pump Backpack Sprayer Tips From Gempler S Youtube

Replacing Seals And Gaskets On A No Leak Pump Backpack Sprayer Youtube
Solo Backpack Sprayer Parts By Diagram Number

Solo 425 Backpack Piston Pump Sprayer The Arborist Store
0 comments
Post a Comment